Click HERE to return to the contents page
[Time: 47:32 min.]Service process [Time: 47:32 min.]
In this session, we will explore the service process. You will learn how to set up automatic generation of equipment cards.
You will see how to define a service contract template, use it to create a service contract and associate the contract with the item.
The we will see how manage customer service calls for items.
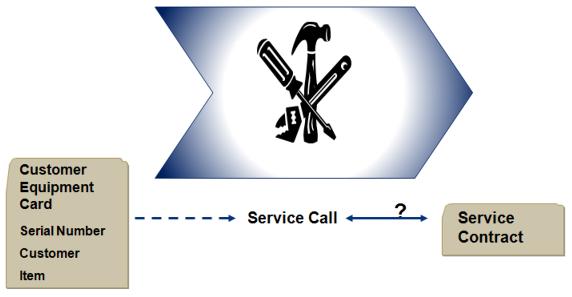
The customer may have a contract defines a service agrement in terms of response time and resolution time. Contracts may also list particular items covered by the contract.
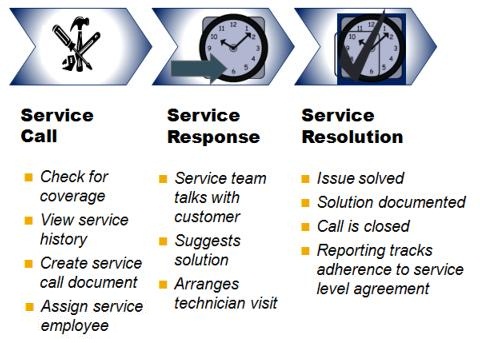
Let us a look at the basic steps in the service process.
A customer calls the service center to request help.
The service representative checks whether the customer has existing coverage for
this item or issue.
The representative reviews the service history for the item.
The representative creates a service call document to record and manage the call.
Deadlines are set for service response and resolution based on the service level agrement.
The service call is assigned to an appropriate employee to respond to the customer issue. This can be done by direct assignment or through the use queues.
The service team quickly responds to the call.
The first-level of service might be to research the problem, using recommended solutions, and suggest a solution over the phone or e-mail. Or the problem might require a service technician to go to the customer.
The time taken for the service response is tracked against the service level agreement.
Ultimate the goal is service resolution.
The service team solves the issue either by suggestions given via phone or from a technician's visit or possible even by exchange the product.
The service team documents the actions taken in the service call document.
When the call is closed, the time for resolution is stamped in the service call.
The service management team can use service reporting to monitor the progress and resolution of all service calls to determine whether the service team is meeting service level agreements.
Let us take a look at the service process from creating the service call, responding to the customer and resolving the call.
I am a customer service representative.
Service > Service Call.
I enter the customer name in the
service call document. I ask which piece of equipment is having a problem (enter
Serial Number). When I press Tab, a contract is automatically found so it
updates the service call.
The customer tells me that the problem is ... (Enter the problem in the Subject field: Server will not connected to network).
I choose the link arrow from Serial Number. I can view the equipment card to can see the previous service history for the item. (Click on the link and look service history).
Notice the deadlines for response and resolution. We need to response to the customer within 4 hours. We have 3 days to solve the problem within the service contract.
I assign the call to a service technician and let the customer know the technician will be calling them back.
Now imagine that I am the technician calling back the customer within the first 4 hours.
Service > Service Reports > My Service Calls; My Open Service Calls. I choose the service call just created.
I go to Solutions tab to search for a solution in our company's knowledge base. (Choose Solutions tab).
I ask the system to recommend a solution. (I choose Recommend).
The customer seems happy with the solution and can make the changes themselves to solve the problem.
I document the actions on the Resolution tab. (Choose Resolution tab and then choose Update)
The time and date of resolution is automatically stamped in the service call. Then I close the call. (Use the dropdown to choose Closed).
The closed on time was automatically stamped in the service call. (Choose Add).
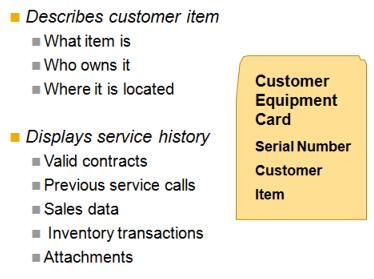
A Customer Equipment Card records the service history for an item that has a Serial Number. The Customer Equipment Card is indentified by Serial Number.
The record contains information on the item number, the customer and the address where the item is located. When you create call for customer, the system looks for a Customer Equipment Card for item needing service. The service representative checks the Customer Equipment Card to see whether the item is covered by any valid contracts. The representative can see any previous or current service calls.
If the Customer Equipment Card was created automatically for a Delivery, all the Sales information is included in the record.
Inventory transactions are also tracked, so it easy to see if the item is still out at the customer site or if it has been brought into your inventory for service or repair.
You can add attachments to the Customer Equipment record as well.
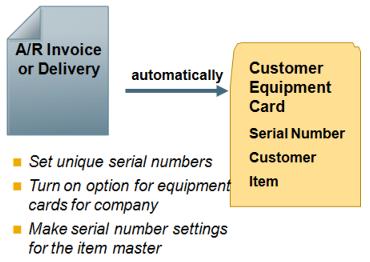
Customer Equipment Card can be created automatically for a Serial Numbered item during Delivery. You activate automatic creation, you must first set Serial Numbers to be unique within your company and then set the indicator for automatic creation of Customer Equipment Cards.
Both these settings are found on the Inventory tab in System Initialization. Then, in the Item Master Record for item, select Serial Number management for the item.

You can also create Customer Equipment Cards manually for items. This is useful if you provide for items that you do not sell.
Mandatory fields include Customer Number, Item Number, and a Manufacturer Serial Number or internal Serial Number.
Demo - Customer Equipment Card
We will look at how to set up automatic creation of Customer Equipment Cards.
The configuration settings for automatic creation of Customer
Equipment Card are found under:
Administration > System Initialization > General Settings > Inventory tab >
Items

In order to have automatic creation of Customer Equipment Cards, there are 2 settings you need to make.
First, you company has to have unique Serial Numbers. (Show setting for unique Serial Numbers)
Next you need to flag the checkbox for automatic creation of Customer Equipment Cards.
Since Automatic Customer Equipment Cards can only be created for serialized items, you need to setup up Serial Number management in the item master record.

Open S10000. Here on the General tab, you can see the settings for Serial Numbers.
Serial and Batch
Numbers
Manage Item by:
Serial Numbers
Management Method: On Every Transaction
Here you can see that the item is linked to a Contract Template. This means that once item is sold, a Customer Equipment Card and a service contract will be created for the customer.
Now we take a look at an existing Customer Equipment Card for one of these servers.
Service > Service Report > Customer
Equipment Card
(Enter
customer C20000 and Item Number S10000)
I can choose the Serial Number and that opens the corresponding Customer Equipment Card (Choose 000189).
At the top of the record, we see identifying information such as Serial Number, Manufacturer's Serial Number as well as Customer and item Number.
The Status field allows you to track whether this item is in Active use at the customer or if it in for Repair, Returned to us, Loaned, or Terminated.
You can also set up Customer Equipment record for any rental equipment you lend to customer during repair. In this case, the loaned status is used when the equipment is on loan to a customer. Sometimes, major changes are made to a piece of equipment and a new Serial Number ia assigned. In these cases, you can use the fields previous SN and new SN to track changes.
There is also a possibility to assign a permanent Technician to the object or to Assign the object to a service Territory to make dispatching a repair technician easier.
Let us take a look at the detailed information in the tabs.
The Address tab displays where the server is located at the customer site. Initially this is populated by the customer ship-to address. You can update this as needed.
The Service Calls tab gives a service history for this item. This equipment has had three Service calls.
The Service Contracts tab lists the customer's Service contracts for this equipment.
If the Customer Equipment Cards was created automatically, the Sales Data tab will display information from the initial Delivery and Invoice for this equipment.
The Transactions tab shows any movements in or out of inventory for this Serial Number. This item was shipped to the customer and has never returned to our stock. You can see the transaction number for the invoice used when this item was sold to the customer.
The last tab, Attachments, allows you to attach documents that pertain to this particular equipment. (Choose Cancel to close)
Formal or legally binding contracts to provide service:
Service Contracts are formal or legally binding contracts where you agree to provide services to the customer during certain coverage times and within a certain resolution time.
There are 3 contract service types, which define what objects are covered.
The Serial Number contract type covers services on items with Serial Numbers for which a Customer Equipment Card exists. Often these contracts provide services for a customer based on an item's warranty.
The customer type is for services for special customers. You might have agreed with a customer to provide services that are not related to any specific item.
The Item Group contract type offers services for certain item groups listed in the contract.

Contracts can be based on predefined contract templates. Using a contract template helps standardize your service offerings because it enables you to work with several basic contracts at one time and the template can be used for automatic creation of service contracts. Templates simplify the creation of service contracts for each customer and speed up the process of creating contracts.
You can duplicate an existing contract template to create a variation.
Template define the contract type, response and resolution
deadlines, coverage information such as service availability times and whether
parts or labor are included. You can also add remarks or attachments.
When you
create a new contract, and you base it on a contract template; these details are
copied automatically from the contract template.
For example, if you add an attachment to a contract template, the attachment is then copied to all service contracts based on the template.
There are two ways to create contracts: Manually or Automatically.
There are also 2 services types associated with contracts:
regular and warranty.
Both service type contracts can be created manually, but
only warranty service types can be created automatically.
Regular contracts must be created manually.
When you create a contract manually, whether it is a regular is warranty service type, your have the option to use a contract template.
However, all automatically generated contracts need contract templates.
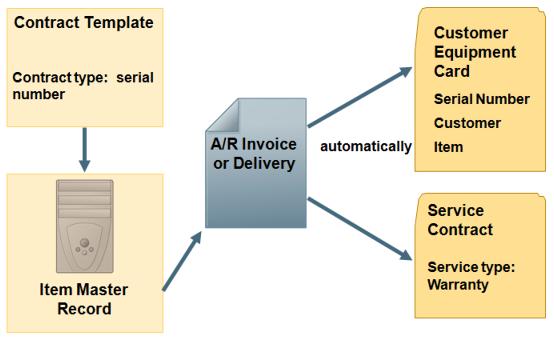
So what are the steps to create a contract automatically?
First, you create a contract template with the contract type Serial Number. This type of contract template is also known as a Warranty template. Then associate the contract template to an Item Master Record in the Warranty template field.
The Item Master Record must be set for Serial Number management and the indicator for automatic creation of Customer Equipment Cards must be activated in General Settings for the company.
When the item is shipped to a customer on a Delivery or A/R Invoice, the Customer Equipment Card and the service contract are automatically created.
The service contract will be created with the service type Warranty.
We will view a Service Contract template, make settings in the Item Master Record for automatic coverage, then create a delivery for this item to view the automatically created Customer Equipment Card and contract.
We would like to set the system to automatically create a contract for each server [laptop[ we sell.
The first step is creating a contract template. Later we will tie this template to the item master for the server so that a contract will be created automatically when the item is delivered to the customer.
Administration > Setup > Service > Contract Templates.

This will be for 2 year warranty.
Because this contract will be associated with an automatically generated Customer Equipment Card, we base this contract on Serial Numbers. A contract could also be based on an Item Group or on a customer, instead a serialized item. However, only contracts for serialized items can be generated automatically.
We will set the service level agreement to require our service team to respond within 4 hours and have the problem resolved within 3 days.
I can set the contract to automatically renew at the end of the period with a reminder to renew 30 days in advance.
I will set the description for this template to be "2 year warranty"
Service is available 24 hours a day, every day of the week. (Select all working days an all non-working days. enter 00:00 in the Start Times field and 23:59 PM in the end Time fields.)
You could exclude holidays from the service availability coverage.
Holidays are defined in
Administration > System Initialization > Company
Details > Accounting tab.
Since we are providing 24 hour service, we will include holidays in our service availability.
All parts and labor are covered, but travel is excluded.
We can add remarks or attachments if we desire.
Now we can save the template by choosing Add.
The next step is to associate the contract template to our server's Item Master Record.
Inventory > Item Master Data. Find the item KD200.
I set the contract template to 2 Year Warranty in the Warranty Template field on the General tab.
You may remember we set our contract template to have the template type Serial Number.
Only contract templates with the template type Serial Number are available to be assigned in the Item Master Record.
Now let us test our settings. I will create A/R Invoice for the sale of server [laptop].
I select Quantity field and choose Ctrl + Tab to open the
Serial Number selection window.
I select a Serial Number and choose Update and OK (Choose
add).
When I add the invoice, the system creates a customer equipment record and and a warranty service contract automatically.
We can view the Customer Equipment Card for the server we sold by choosing
Service > Customer Equipment Card
(Search for all Customer Equipment Cards for he customer C20000 and the item KD200)
I can view the Service Contract by choosing
Service > Service Contract
You can also just click the last record icon to view the CEC and contract. We can see the Service Contract - notice the description and the Contract terms agree with settings we made in the Contract template.
On the Coverage tab, the service availability times are listed by day and hours. You can set time periods for each day, including 24 hours. We also see whether holidays included.
We see that coverage is 24/7 based on our Contract template.
We see what types of service are covered, such as Parts, Labor, and/or Travel costs. We see that Parts and Labor are covered, but Travel is excluded. This ha defaulted from our contract template.
Service calls record and track an incoming customer complaint or problem. From the service call, you can manage activities, document actions, manage repairs and expenses, create invoices of goods movements for service parts, search for solutions, and keep track of the service call history.
When a call comes in, typically the customer service representative asks if the service is for a particular item.
If the Customer Equipment Card exists for the item, the representative can add it to service call document. Often a customer has a valid service contract to the item is covered by warranty.
I there no valid service contracts for the customer or if the call comes in outside coverage time, the system issues a warranty as you create the service call.
Of course you do not have a Customer Equipment Card, service calls can be created for any item of just for a customer without any items listed.

When you create a service call associated with a contract, deadlines for service response are calculated based on the coverage and response time detailed in the contract.
The contract's Coverage tab contains a profile for when service are available to the customer, such as Monday-Friday 8-17 or 24/7 coverage.
The contract also specifies how quickly the service
department must respond to and resolve request in number of hours or days.
This
is known as the Response Time.
It is the combination of these 2 requirements that calculates the hour by which the service team must respond.
The service availability hours specified in the coverage section of the contract can make a huge difference in how the response deadlines are calculates.
For example, imagine that the contract requires a response time within 8 hours and a customer calls at 13 p.m. on Monday afternoon. If our service hours are only 8 a.m. to 17 p.m., then according to the service level agreement, we have until Tuesday morning until noon to respond. That assumes 4 hours on Monday afternoon and four hours on Tuesday morning for service coverage. However, if our service hours are 7 a.m. to 19 p.m., then we have a 6 hours on Monday and 2 hours on Tuesday morning to respond. So the deadline is calculated to be Tuesday at 9 a.m. That is big difference.
So I ask you, what if we were open 24 hours? Then the 8 hours would begin at 13 p.m. and go until 21 p.m. that same evening.
How you set your service availability coverage is as important as how you set the response time.

Ultimately, the goal to resolve the customer's issue to the point the customer is totally satisfied. At that point, we can enter the service resolution into the service call.
The required service resolution time and date is calculated in the same way as the response time, according to the resolution time and coverage of the service contract.
The calculated date and time required for resolution appear in the By field.
The actual date an time of the resolution goes in the On field.
This time is stamped automatically by SAP Business One when you add a resolution text or attach a solution to the service call.
The last step is to mark the service order as Closed. You cannot set a service call to Closed if you have attach a solution or entered a resolution. The time and date when the service call status was set to Closed are captured in the Closed on field.
If you reopen a service call, this date and time will be deleted.
Note that deleting solutions from the solution tab the text from the Resolution tab clears the Resolution On filed. The Response On field remains because you are still responding to the service call which is no longer resolved.
Let us take a detailed look at creating a service call.
Imagine that our customer has called to report a problem with their laptop. I create a service call to record the issue.
Service > Service Call to create or maintain service Calls.
I enter the customer information first in the header area. The header of the service call contains basic information about the call: the customer, the contact person, contact information, the subject of the call, a related service contract and any Serial Numbers for the object of the call.
I ask the customer for the Serial Number of the server with the problem then search for the equipment card for this customer.
If a contract is found, it is automatically entered in the contract number field. If no contract is found, the system will warn us.
The system also does a credit check for the customer, and provides the appropriate alert if required.
The laptop cannot connect to the network, so I enter that as the subject. Subject is mandatory in a service call.
At the top right, we can see the call status begins as Open. If we are waiting for the customer to respond, we can set the status to Pending. You can set a Define New. When the problem is resolved, we will Close the call.
The fields on the General tab allow me to add more details about the problem or the service call. This tab also contains information about who will be handling the service issues.
The Origin of the call is Telephone No.
You can set up problem types and call types to categorize the types of customer issues you receive. If you cannot find the right choice, you can use Define New to create new Problem Type. Example for Call Type: High, [Low, Medium, Urgent, Define New].
When I choose Update, the deadlines for response and resolution default from the contract to the service call. Notice that the deadlines for Response and Resolution appear in the By fields.
I need to respond to the customer within 4 hours. I have 3 days to solve the problem within the service contract.
You can assign a service call to a user or to a queue that you have defined. I will leave the assignment as is.
The Remark tab allows me to describe the problem and any actions in detail. (Write in the Remark tab: Customer was very concerned about this network card).
I can record all the analysis I do and any solutions I come up with on the Activities tab.
As I talk the customer, I give a suggestion for how to solve the problem.
The customer tries it while I am on the line and is satisfied.
I could create an activity to follow up with the customer on the Activities tab (Choose Activity).
Although we will not explore all the tabs in detail now, I would like to mention some of the other useful tabs in the Service Call document.
The Solutions tab connects us with a solutions Knowledge Database that can help us to search for possible solutions the customer issues.
The Expenses tab tracks any labor or parts associated with this service call. You can even create invoices directly from his tab.
Service history for this call is captured on the History tab. (Choose History)
When I update the service call to bring in the service level agrement profile, the history tab captured this information. Each action performed in the service call will tracked here.
Since we have solved the customer issue, we can enter a resolution and close the call. (Choose Resolution tab). I enter the resolution in the Resolution text area.
When I choose Update, a resolution time and date is stamped automatically. I can see the date stamp on the General tab. (Choose Update, return to General tab).
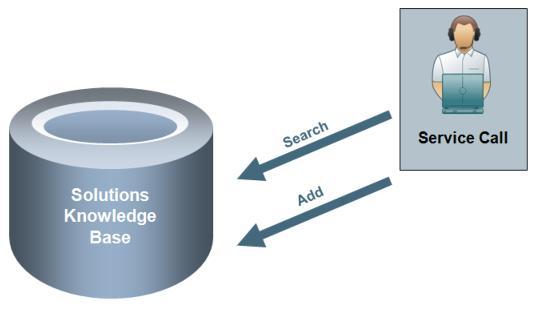
The solutions Knowledge Base is a collection of solutions for known problems.
You can create and update common solutions to customer's problems and questions. You can search for existing solutions and link an existing solution to a service call. A service call can have than more solutions if appropriate.
When you find a new solution for a problem, you can add it to the knowledge base directly form the Service Call screen.
Therefore, the next time a similar problem occurs, the technicians are aware of possible solutions and can more quickly resolve customer issues.
Solutions have statuses, such as Internal, Publish, and Review. New status can be defined. Status can define how a solution should be used.
Authorization control who can modify the solutions status.
Demo - solutions Knowledge Base
We will look at now to create a solution in the Solution Knowledge Base.
The Solution Knowledge Base can help you to leverage the knowledge of your service team to help less experienced agents.
Imagine that you are a new agent and your customer reports a new problem. You can do a search from inside the service call to see if a solution is listed in the Solution Knowledge Base (OSLT Table).
Then I choose Recommend. Solutions that were previously attached to a service call for this item are considered to be recommended solutions, and will displayed for new service calls. Click ID navigation arrow.
Similarly, if I discover a solution to a problem not addressed in the database, I can add the solutions. [I press New]. I enter the item, solution, and symptom. I enter cause. Status: Internal, Publish, Review, Define New. The I Add a solution.
Service > Solution Knowledge Base
[I Enter the Item, the Solution, the Cause and the Remark].
If I want this solution to be available to others, I set the status to Publish. Although the status is informational only and the system will not filter the solutions that are displayed, it is a useful business practice to set status. And I Add the solution.

You can view expenses arising from a service call on the Expenses tab.
Here you see all A/R Invoices, A/R Credit Memos, Orders, Deliveries, and Returns that you create4d during the handling of this service call.
If you select the display all documents indicator, the system also displays stock transfer (transfers to the technician and returns from technician).
To get a detailed view or to enter new expenses, choose Expenses Details.
The system then displays all documents grouped by items that belong to the type Items and items belong to the types Labor or Travel.
If you choose New Document, you can create stock transfer to technicians, return to stock from technicians, Sales Orders, Deliveries, Returns, A/R Invoices and A/R Credit Memos.
We will look at how to enter service expenses for a service call.
I will play the part of the technician who has just visited a customer site and made a repair. I open the My Service Calls report to view calls assigned to me.
Service > Service Reports > My Open Service
Calls
(Open the service call from report).
I enter resolution on the Resolution tab to show I have repaired the server.
(Enter: I traveled to customer site and replaced the network card" in the Resolution text field).
Now I will enter expenses on the Expenses tab. I choose Expenses Detail.
Here I would see any expenses associated with the service call. None exist yet. To create expense O choose the button for New document. Then I choose the document Type: Transferred to Technician, Order, Delivery, Returned from Technician, Returns, Invoice, Credit Memo.
There are several type available. Most are marketing documents, but you cal also create stock transfers. For example, if I wanted a part transferred the main warehouse to my technician stock, I could do that by choosing Transferred to Technician. That would open an inventory transfer.
Today, I would like to invoice the customer for parts I have used. I will also include mu labor and travel time in the invoice.
I put a 100% discount on the first and second items because they are covered by the warranty.
The system alerts me that there are changes not allowed under the contract, that is why I have marked those items a 100% discount. I have listed those so that I have expenses tracked in the system. Plus this way the items will appear on the invoice but will be shown with no cost. It is always a good idea to let the customers know what they receive for free under their contract. I accept the system messages and choose Continue.
My last step is to change the call status to Closed. Choose Update and OK. Now my work is done.